How to Connect Telegram Bot to amoCRM via Umnico
Telegram Bot is a powerful tool for automating customer communication. It allows you to handle common inquiries 24/7, reduce the workload on your team, and maintain consistent service quality. Bots are especially useful for businesses that need to respond quickly and build predictable communication workflows.
Integrating Telegram Bot with amoCRM through the Umnico platform allows you to combine the messenger with your CRM system, accelerate inquiry processing, and establish a transparent, manageable sales pipeline.
Benefits of integrating Telegram Bot with amoCRM via Umnico:
✅ Receive new inquiries from Telegram Bot as deals in amoCRM.
✅ Respond to client messages directly from the CRM interface.
✅ Automate business processes: assign tags, set statuses, and distribute among users.
✅ Analytics: monitor response times and inquiry sources.
Contents
Connecting Telegram Bot to Umnico
To start using Telegram Bot in Umnico, follow these simple steps. The connection process will take just a few minutes.
Tutorial Video
If you prefer visual instructions, watch our video to connect the channel.
Step-by-Step Connection Guide
- In your Umnico account, open the menu "Channels → Telegram Bot".
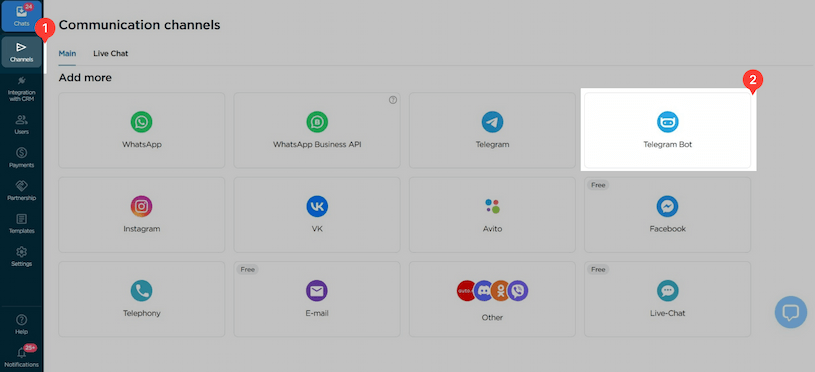
- A connection window will open.
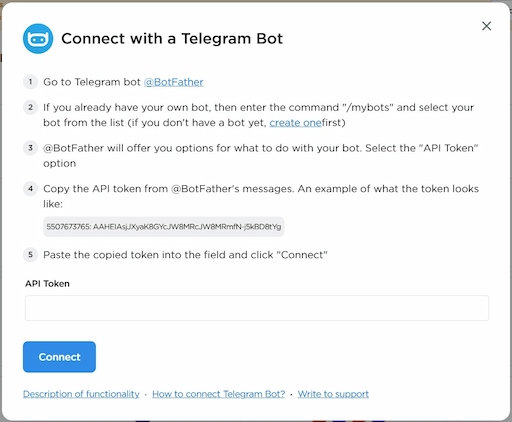
- Open the Telegram app and tap the search icon. In the search bar, type "@BotFather" and make sure you select the official bot (marked with a white checkmark inside a blue star). Select this bot.

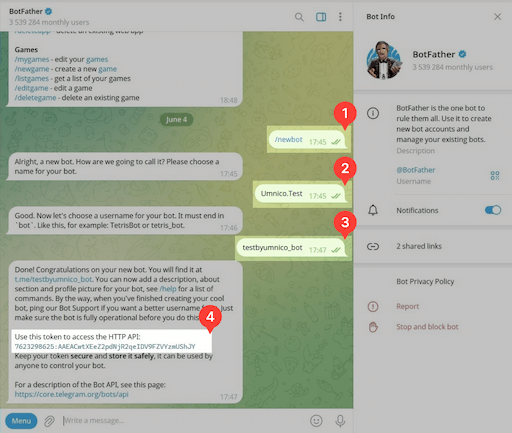
- Send the command "/newbot".
Come up with a name for your bot. BotFather will check the availability of the chosen name and may suggest adding "_bot" at the end (for example, Bot_Umnico_telegram_bot).
Once confirmed, BotFather will provide you with an API token for connection.
Copy the token.
- Return to Umnico, paste the copied API token into the corresponding field, and click "Connect".
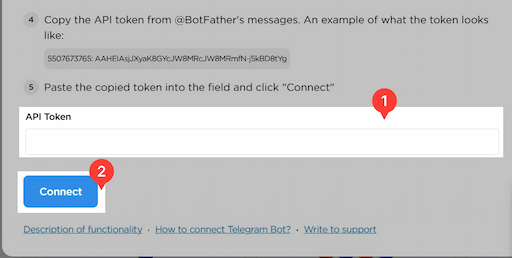
- Done! After successful connection, the Telegram Bot will appear in the list of connected channels.

Connecting amoCRM to Umnico
The next step is to link Umnico with your amoCRM.
Tutorial Video
If you prefer visual instructions, watch our video. If you prefer a step-by-step breakdown, proceed to the next section.
Step-by-Step Guide
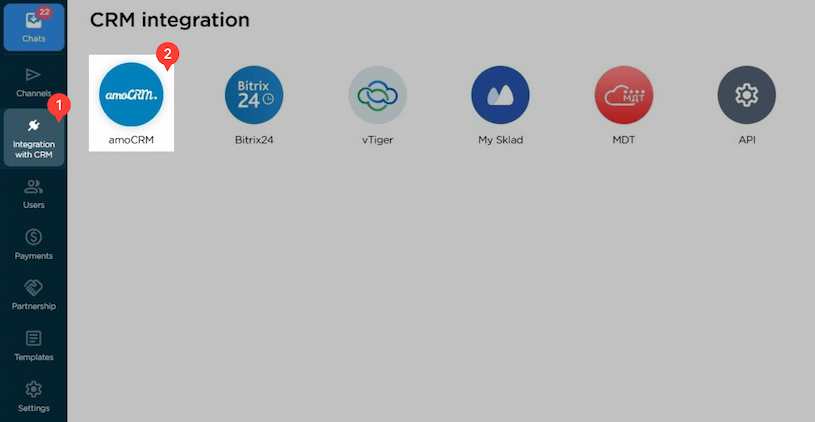
- In your Umnico Personal Account, select from the side menu: "CRM Integrations → amoCRM".
- Click "Connect". An authorization window will open.
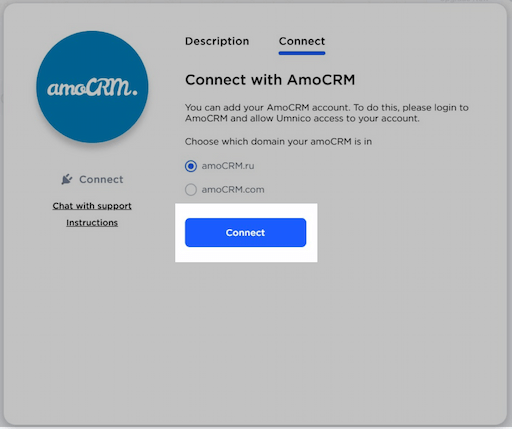
- In the opened tab, select your amoCRM account (you must be logged in) and confirm the integration permission.
- After connecting, the Settings page will open:
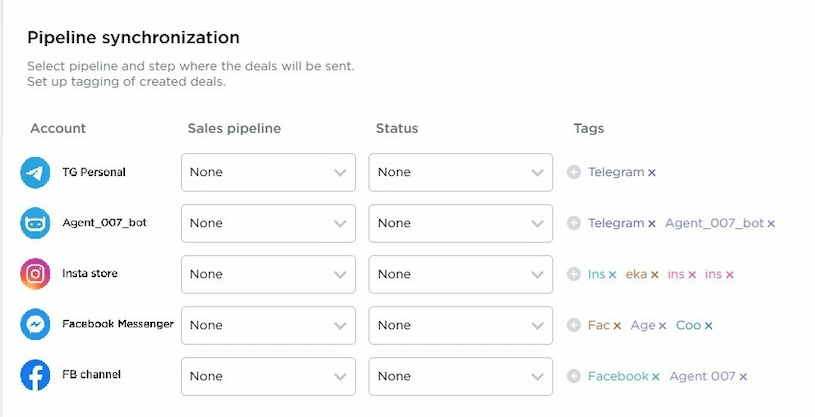
Pipeline Synchronization
Select the pipeline and status where new deals from Umnico will be directed. If you send inquiries directly to the main pipeline stage, the system will automatically add tags to deals: integration channel (e.g., Telegram Bot), message type (message or comment). If you choose the "Send to 'Unsorted' of the main pipeline" option, tags and the work phone will not be added.
Access Settings
To connect, you need to authorize in amoCRM and confirm permissions for integration with Umnico. This ensures correct data transfer between platforms.

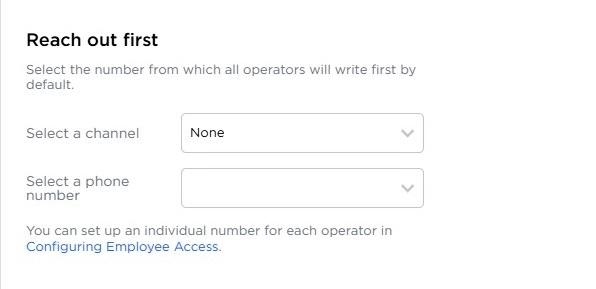
Reach out first
You can start a conversation with a client from a deal in amoCRM — even if they haven't messaged you yet. This feature is available only for WhatsApp and Telegram Personal, provided the client's number is already in the contact card.
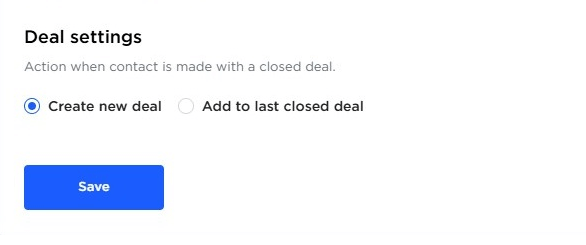
Deal Settings
Configure the logic for handling repeat inquiries: create a new deal or add the message to the last closed one. This helps avoid duplication and keeps the entire communication history with the client in one place.
Once everything is set, click "Save" to apply the changes.
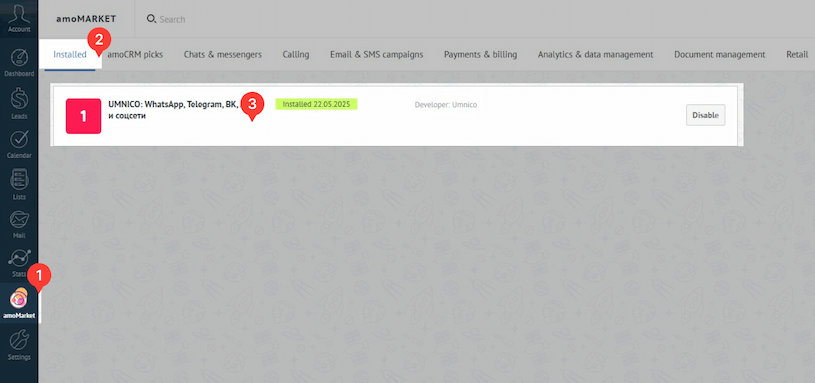
- After completing the integration setup in Umnico, go to amoCRM.
In the left side menu, select the "AmoMarket" section. Then open the "Installed" tab — Umnico will appear in the list of installed applications. Click on Umnico to open the integration description page.
Click the "Save" button.
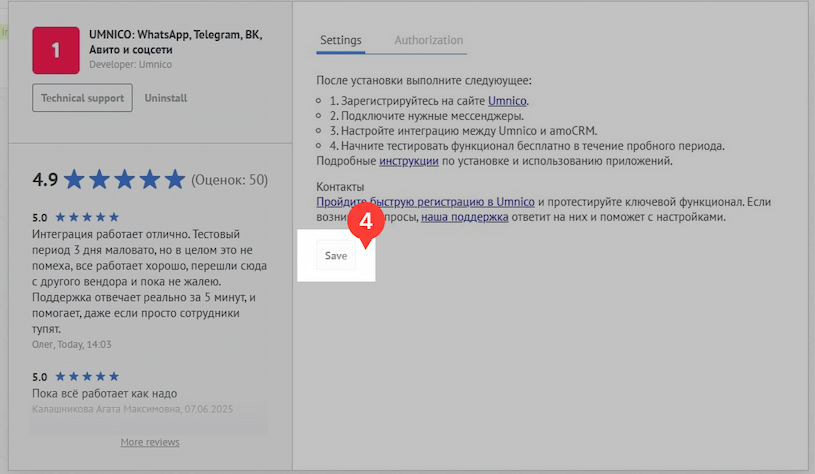
- Done! The integration is now fully set up and ready for use.

In the amoCRM side menu, the Umnico widget will be displayed. It offers extended capabilities for interacting with clients. For more details on its functions, read the "Umnico Widget in amoCRM" guide to make the most of the integration.
Working with Telegram Bot Inquiries in amoCRM
Integrating Telegram Bot with amoCRM allows you to establish a clear and manageable process for handling inquiries. All conversations are displayed within the CRM, simplifying communication control, increasing response speed, and improving service quality.
💬 New Telegram Bot Inquiry = New Deal
When a potential client first messages you on Telegram Bot, a new deal is automatically created in the selected sales pipeline in amoCRM. The deal will be tagged "Telegram" and contain user data, including the conversation, name, and, if available, phone number. This allows you to start working on the request immediately without manual data entry.
🔗 Linking Inquiries to Existing Clients
If the client's Telegram account is already registered in the amoCRM database (e.g., by phone number), the new conversation will automatically be linked to the existing contact or previous deal. This helps maintain interaction history and avoid duplicating clients in the CRM.
📨 Initiating Conversations with Clients
With amoCRM, managers can reach out to customers first via Telegram Personal or WhatsApp (including both web and business accounts) — all you need is the customer's phone number. This feature comes in handy for reengaging warm leads, sending reminders, discussing terms, or sharing documents.
By integrating with Umnico, communication channels expand even further. Through the Umnico widget within amoCRM, it's possible to reach out first across Telegram Personal, WhatsApp, Email, and WhatsApp Business API. This ensures efficient interaction with clients.
🔄 Continuing Conversations in Closed Deals
If a client messages again after a deal is closed, you can choose where to direct the message: to the last closed deal or create a new one. This helps retain the context of the inquiry and saves the user's time, especially in long-term or cyclical sales.
👥 Manual and Automatic Routing
Using built-in amoCRM tools or integrations with Umnico, you can assign deal responsibilities manually or automatically — for example, based on inquiry type, time of day, or user workload. This increases response speed and helps meet SLAs.
📊 Source Analytics
In amoCRM, you can track how many deals came through Telegram Bot, at what stage they stall, how many sales are made, and how much time users spend responding. Thanks to tags and reports, you'll easily understand how effective this communication channel is.
Frequently Asked Questions (FAQ)
❓ Can I connect multiple Telegram Bots?
Yes, you can connect several bots and/or personal accounts.
❓ What happens if I log out of Telegram?
If you sign out from your account, integration through the Telegram bot will be paused. To resume functionality, you'll need to reauthorize Telegram in Umnico again.
❓ Are attachments and files transferred?
Yes, all messages, including photos, documents, audio, and video, are transferred.
❓ Is the integration secure?
Yes. Umnico uses secure authorization and does not store your personal Telegram Bot data.
Help & Support
If you have any questions, feel free to contact us — we're happy to assist.
To reach Umnico support, click the "Chat with support" bubble in the bottom-right corner of your screen. Or go to the "Help → Chat with Support" section in your Personal account.
Related Guides & Articles
We recommend exploring
WhatsApp connection to amoCRM
How to Connect Avito to amoCRM via Umnico
You might be interested
Telegram Mini Apps: How They Work and Their Benefits
Customer Experience Optimization: How to Make Clients Fall in Love with Your Products

 3-days free trial period