How to create chatbot for Instagram in Umnico builder
Instagram is not only a platform where one can share content with their followers, but also a powerful tool for brands interacting with your audience. However, manually communicating with each customer can be time-consuming, which makes chatbots indispensable assistants in the process. In this guide, we“ll show you how to connect your Instagram account to Umnico and set up a chatbot to communicate with your customers.
Why companies need chatbot for Instagram
Instagram chatbot is an automated software that interacts with the social media platform“s users in direct messages and comments. The chatbot works based on pre-defined scripts and algorithms, allowing brands to provide instant answers to frequently asked questions, process orders, and provide 24/7 customer support. With the introduction of artificial intelligence technologies, chatbots can understand and interpret different user queries, making communication more natural and intuitive.
Integrating a chatbot with Instagram is done through the platform“s API, which allows it to access information about users and their interactions with the account. In addition to responding to messages, the bot can send users personalized offers, reminders, and feedback surveys. This helps businesses improve the customer experience, increase audience engagement, and drive sales.
Key features of chatbot for Instagram
Using a chatbot for Instagram provides businesses with the following functionality:
- Automatic responses to comments under posts save employees time in responding to the multitude of comments that appear after a new post.
- Triggers allow you to set up specific scenarios of chatbot responses to various events, for example, the use of specific keywords by a user in a post, a mention in a Story, and so on.
- The visual chatbot builder makes it easy to set up even complex scenarios with many forks for users who have no programming skills. Blocks can be dragged, copied, and rearranged.
- Integration with analytics services and CRM systems allows users to analyze interactions with clients, as well as store the entire history of communication with each of them in a single system.
How much does it cost to build an Instagram chatbot?
The price of creating a chatbot for Instagram depends on several factors, including the complexity of the functionality, the technology used, and the experience of the developers. Ultimately, the cost of the project depends on the specific needs of the business and its goals for using the chatbot.
Connecting Instagram business account to Umnico
To set up a chatbot for Instagram, you first need to connect your social media account to the Umnico Messenger Aggregator. To do this, you will need access to Facebook Manager with account owner rights.The Instagram account must be verified in Facebook Manager beforehand.
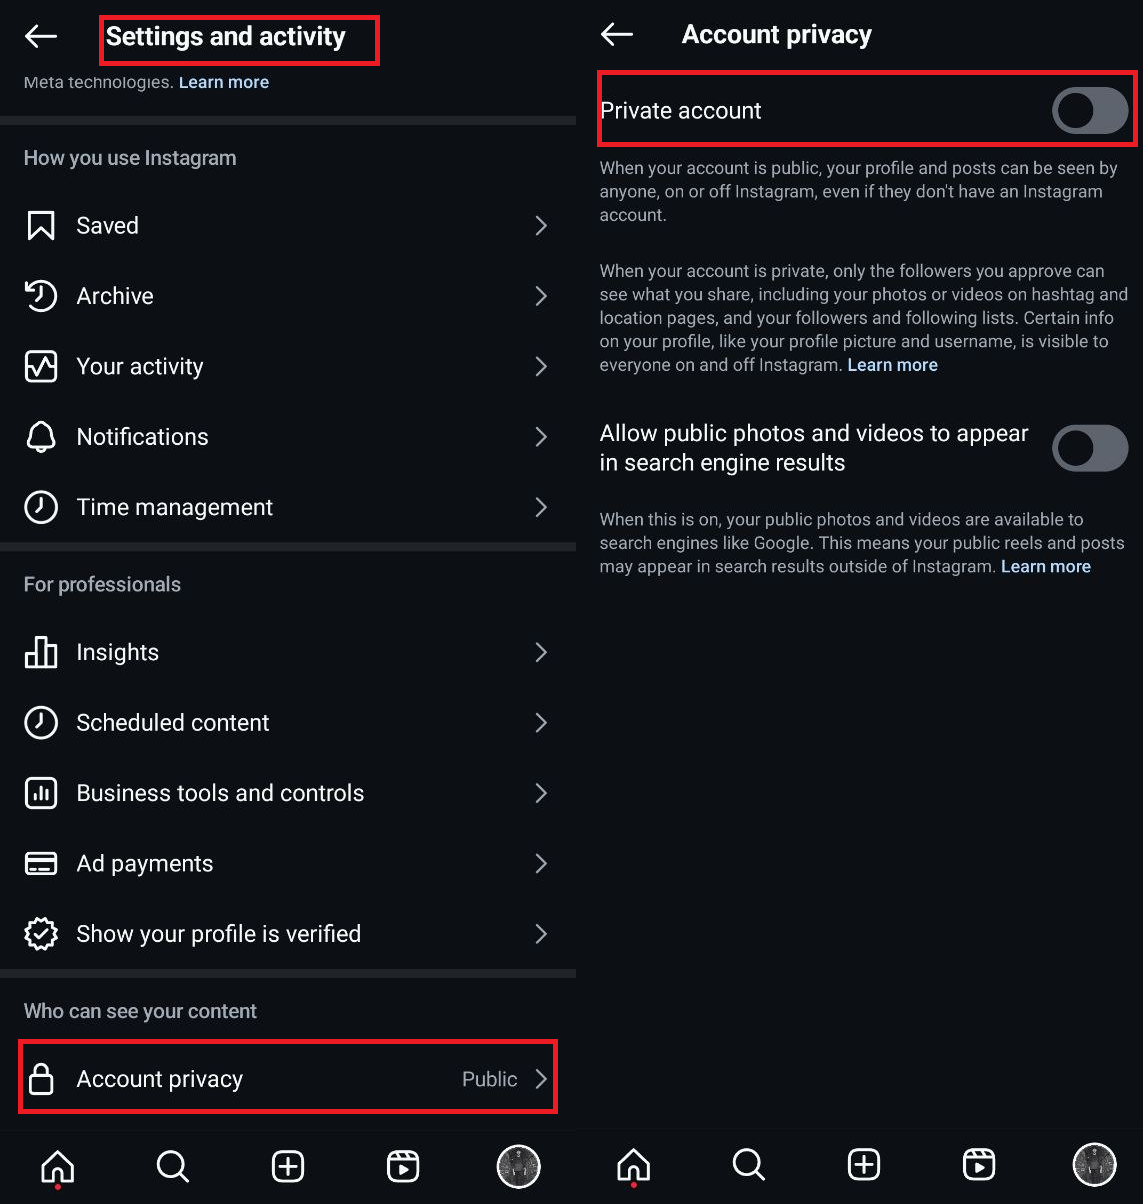
1. Switch your Instagram account from private to public. To do this, in the Instagram mobile app, go to “Settings and Actions”, then “Account Privacy” and turn off the “Private Account” option.
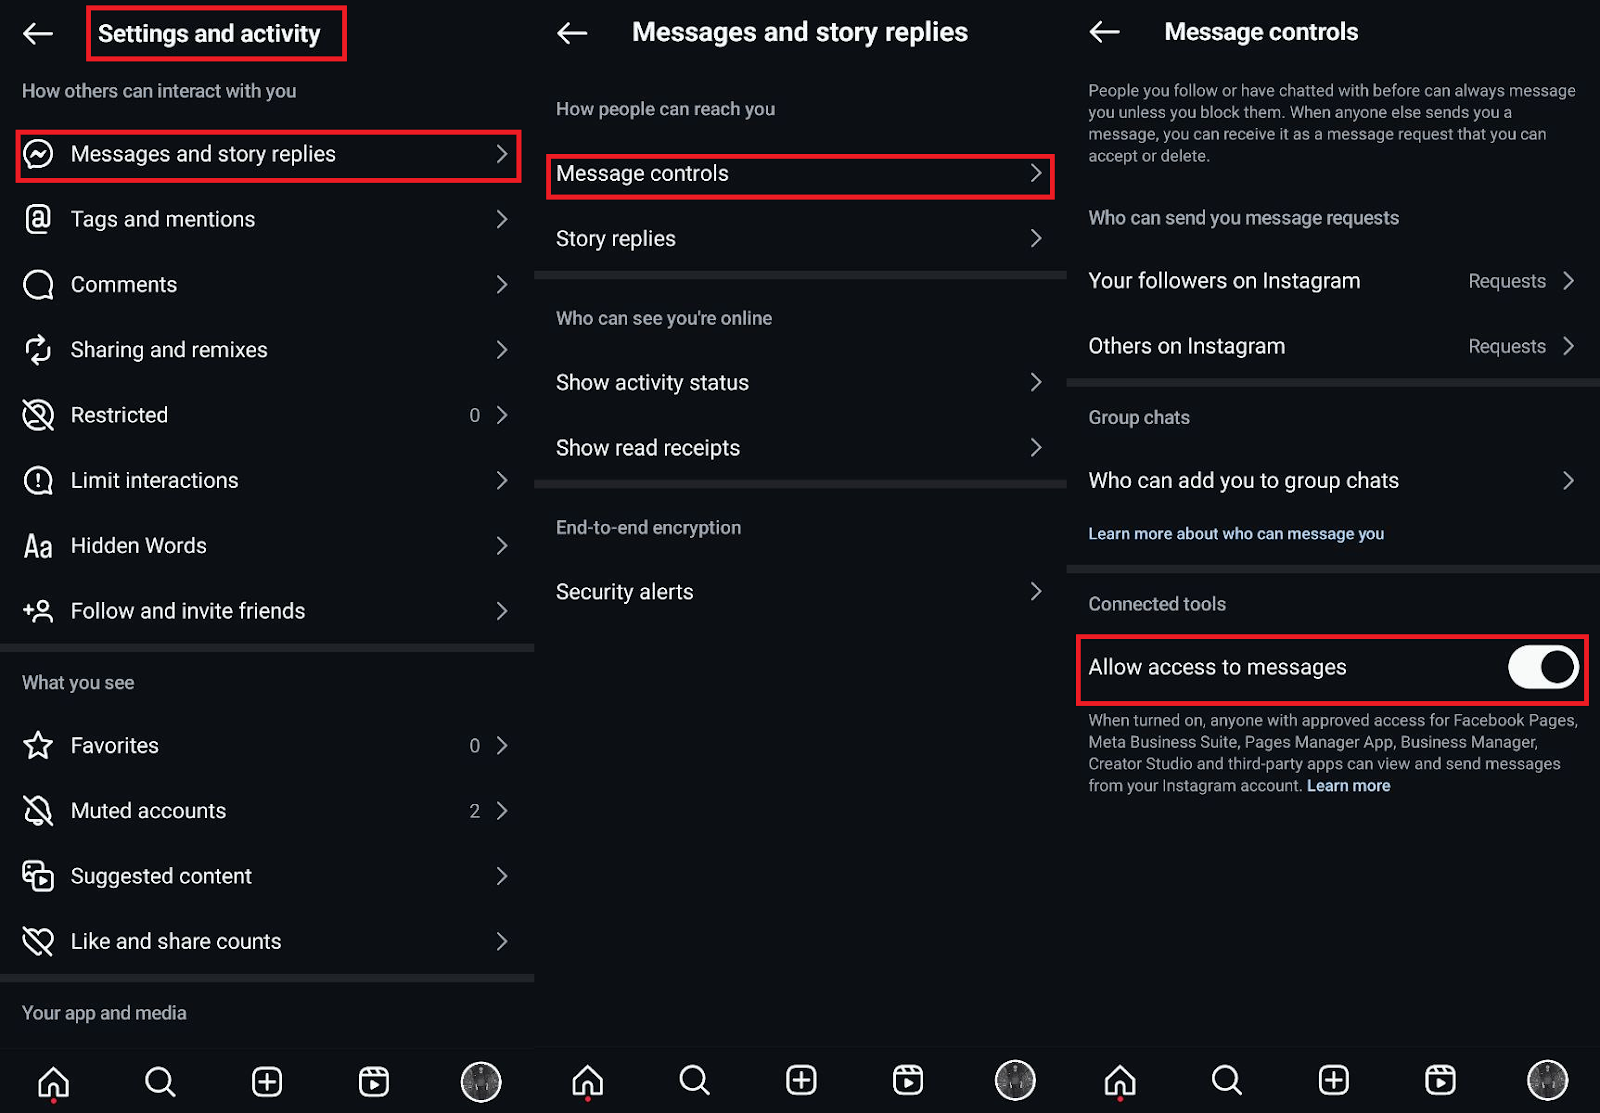
2. Next, go to “Settings and Activity”, then “Messages and story replies” and select “Message controls”. In the “Connected tools” section, activate the “Allow access to messages” option. If this option is missing, make sure you have disabled “Account privacy” option (step 1).
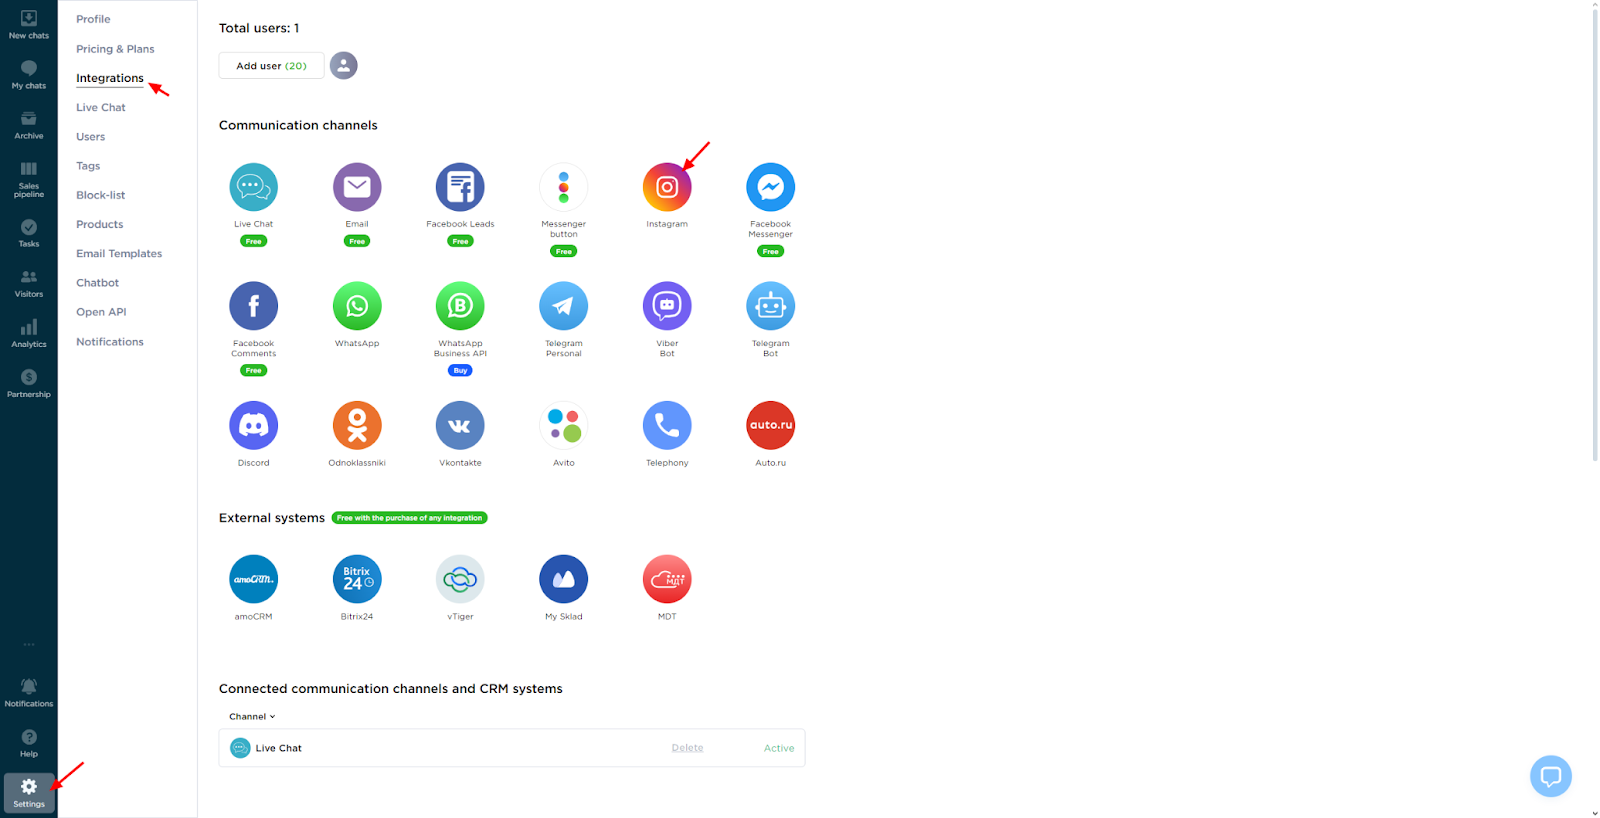
3. Open Umnico. In the left menu, select “Integrations” and find “Instagram”.
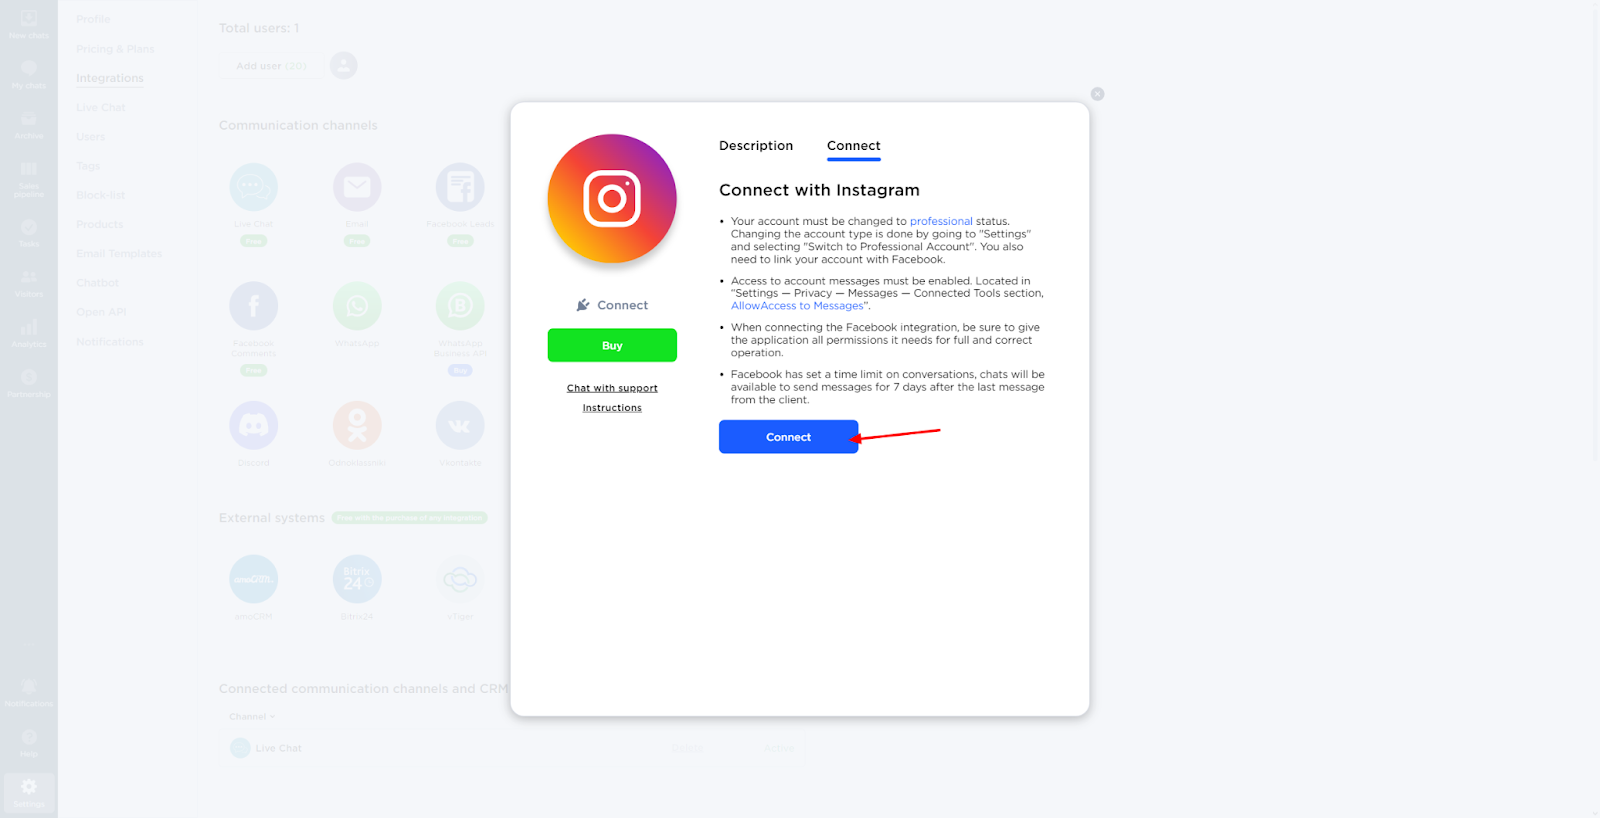
4. In the window that opens, click “Connect“. Before you do this, we recommend that you read the information on setting up and using the Facebook API.
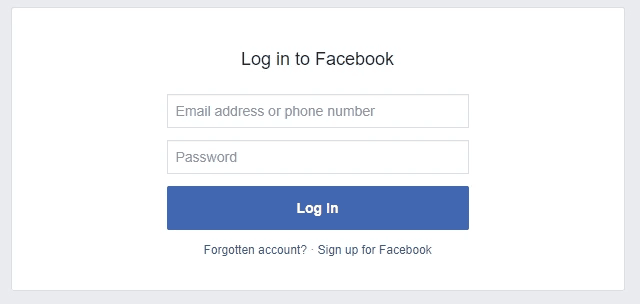
5. Enter the username and password of the Facebook account associated with your Instagram account and click “Login in“. If you are already logged in, select “Continue as...“.
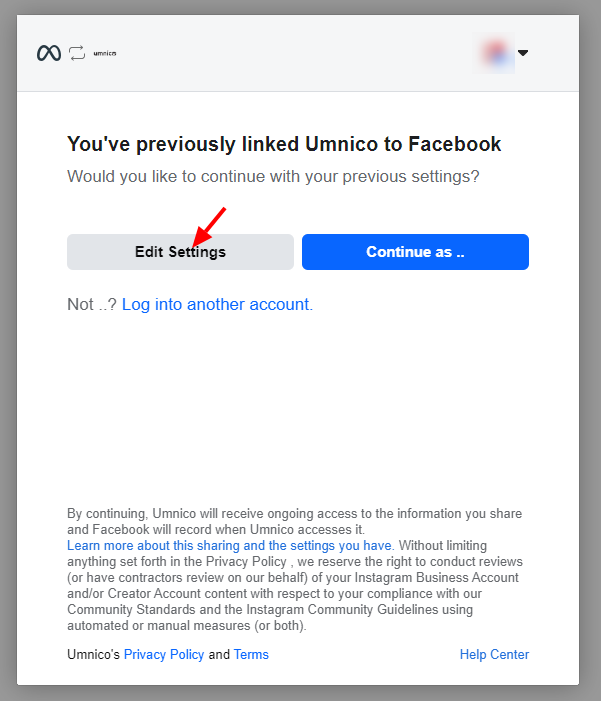
6. Click “Edit Settings“.
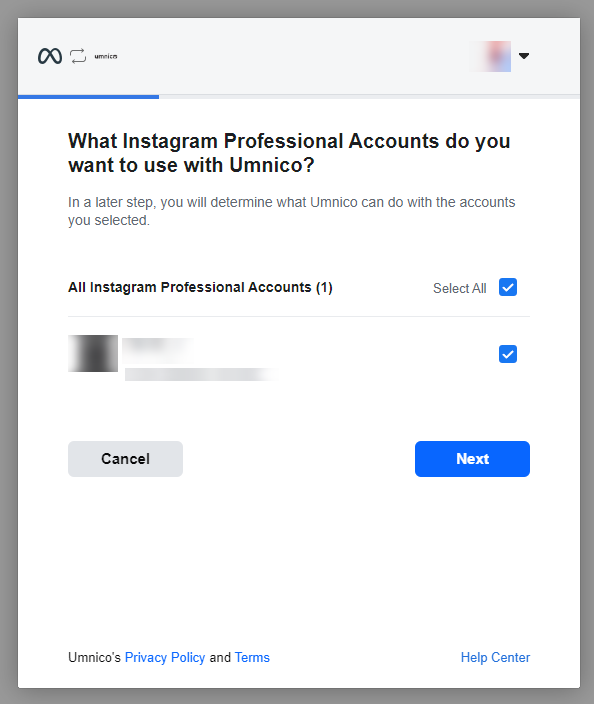
7. Select the accounts you want to connect to Umnico by checking the boxes. Click “Next“.
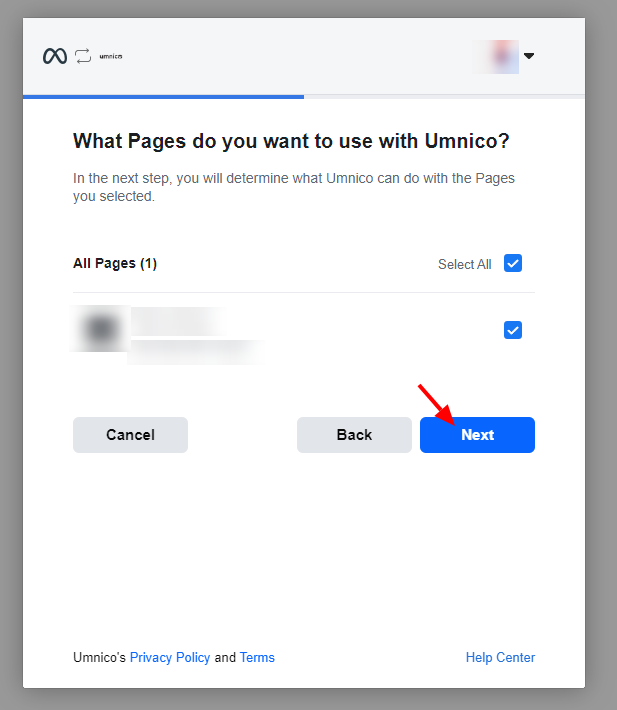
8. In the window that appears, select the Facebook page you want to integrate with the selected Instagram accounts and click “Next“.
9. Make sure that all required permissions for the Umnico application are selected and click “Next“.
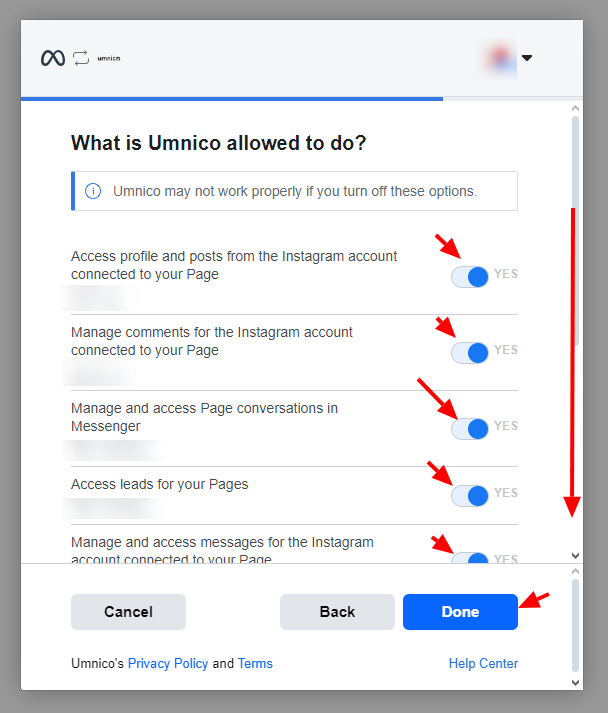
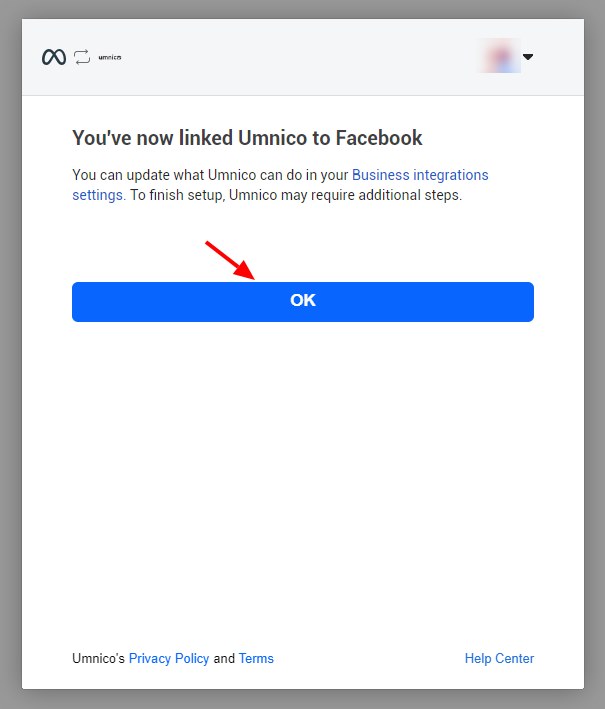
10. Click the “OK“ button to complete the Facebook integration process.
11. Next, select the group you want to connect with your Instagram account and click “Connect“.
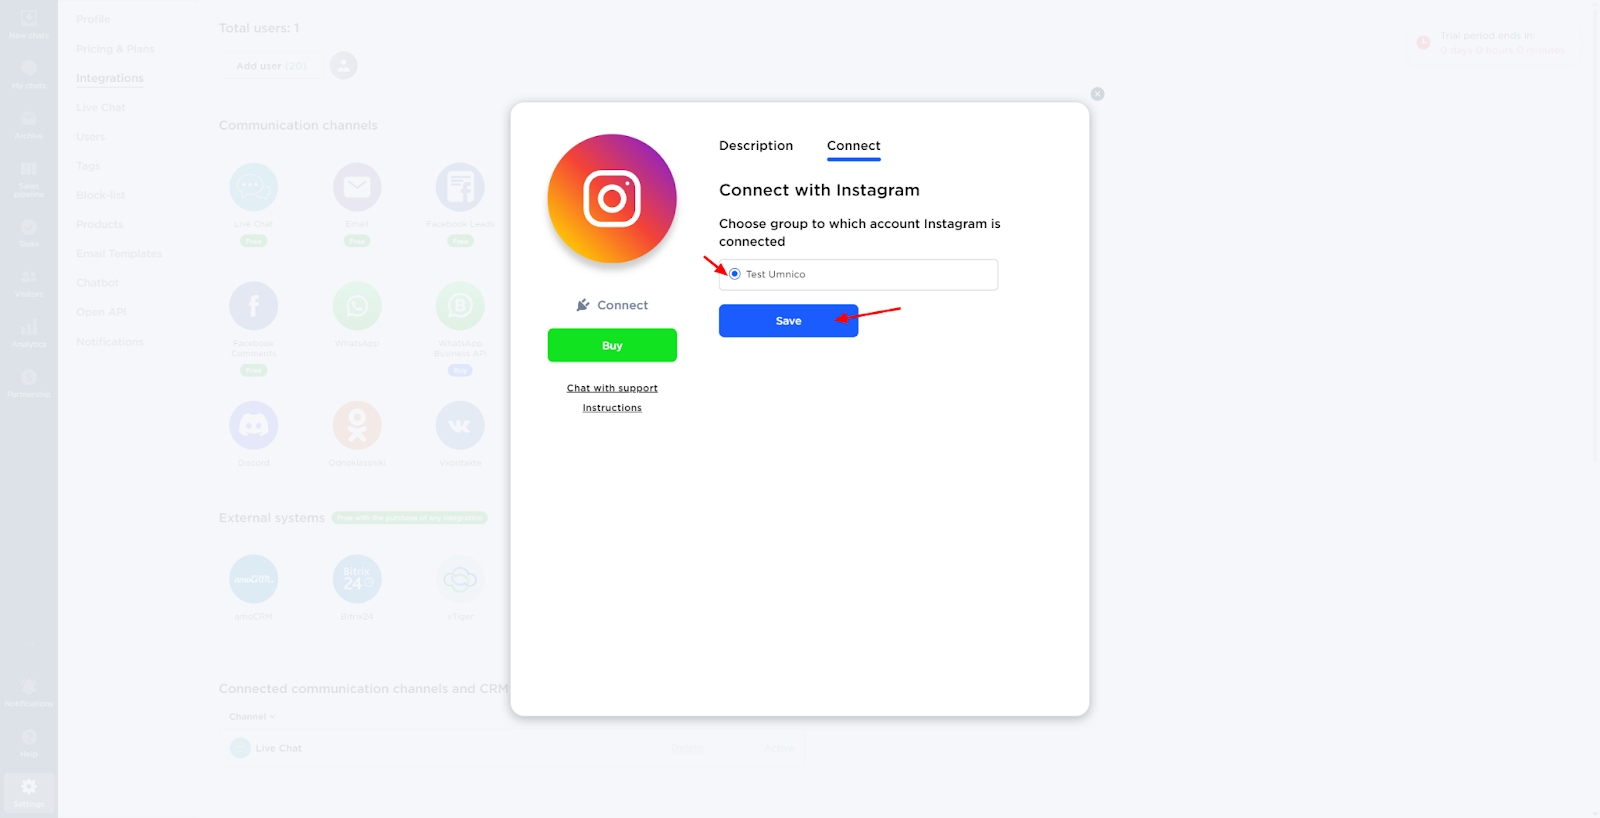
From now on, all posts and comments from the connected Instagram account will automatically go to the selected Umnico group.
Setting up a chatbot for Instagram in Umnico builder
Once your Instagram account is connected, you can start developing your chatbot script.
1. Creating a chatbot project
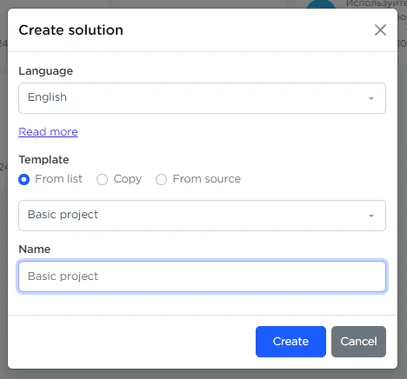
Creating a chatbot on Instagram using the Umnico Builder starts with creating a bot project.
In Umnico, go to the “Chatbot“ section from the left menu. Then click on “Create project“ to start the process.
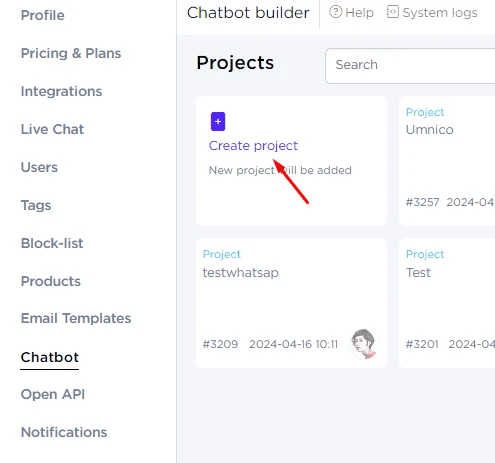
- To create a bot based on a ready-made list of templates, select “From list“ and specify a name for your Instagram bot.
- If you want to modify an existing template, choose “Copy“.
- To work directly with the code, select “From Source“.
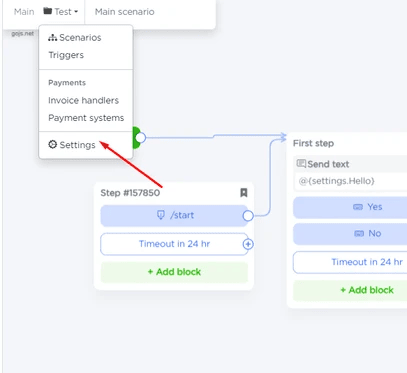
In the settings of your chatbot project, set Instagram as your messaging platform by clicking Settings.
In the Messengers tab, enable Instagram Direct integration and save your changes by clicking Update.
2. Creating chatbot script for Instagram
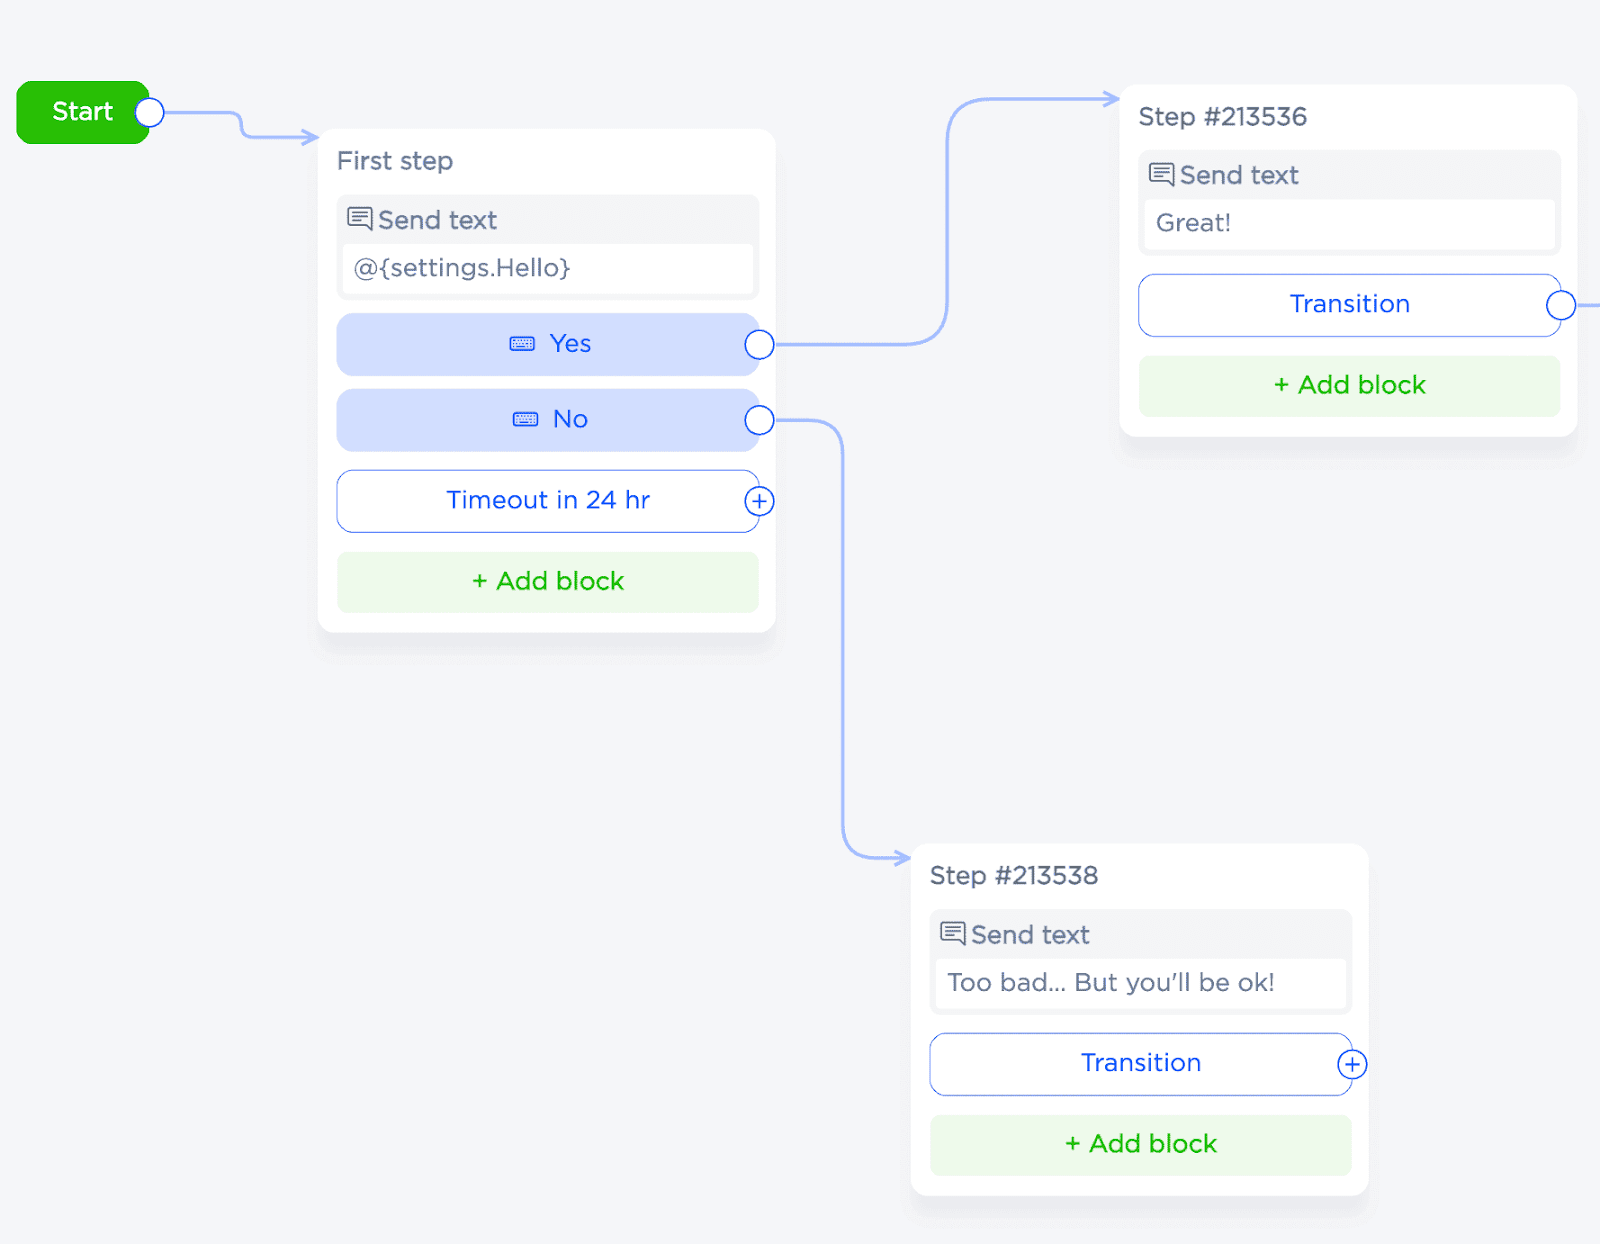
The chatbot builder is based on a visual flowchart where users can customize message chains by adding blocks of text responses, triggers, actions, and conditions for their execution.
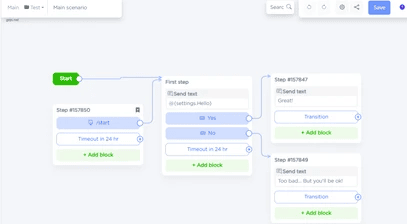
To add a new step, click on the “+“ sign next to the last block, or right-click in a blank space to add a step without linking to the previous ones.
Each step can contain multiple actions that are performed in sequence. Add actions using the Add Block button and change their order using drag and drop.
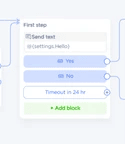
You can change the order in which the blocks are triggered by dragging the ends of the arrows. To delete an arrow, select it and press the Delete key.
3. Conditions
To create a branched structure of dialog with the client depending on certain parameters, you can introduce conditions when setting up a chatbot script. To do this, select “Condition“ from the “Add Block“ menu.
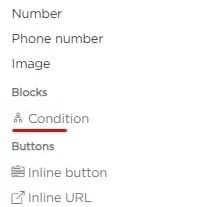
When scenario execution reaches the Condition block, the system checks each specified condition sequentially. The first condition evaluated as true determines the further path of the dialog. If none of the conditions is true, the scenario defined in the Else block (if defined) is executed. This allows you to create complex scenarios with many possible variants of the conversation flow.
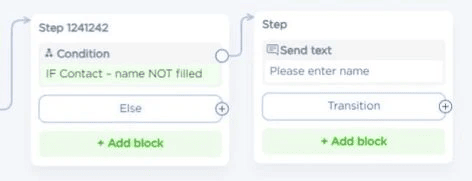
A condition block can be freely moved within a Step or between Steps by holding down the left mouse button and dragging it to the desired location. For ease of navigation and organization, each condition block can be given a unique name by double-clicking on its title.
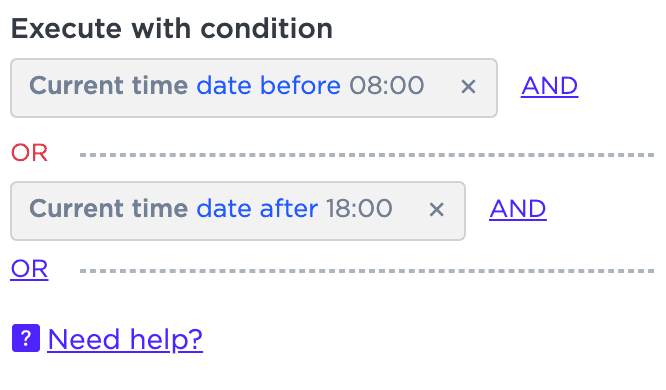
In the block below, the condition will be true if the current time does not match the range from 8:00 to 18:00. This means that the condition is fulfilled outside of a normal working day.
In the next block, the condition is true if the current time falls within the specified range. Thus, this condition applies during a normal workday.
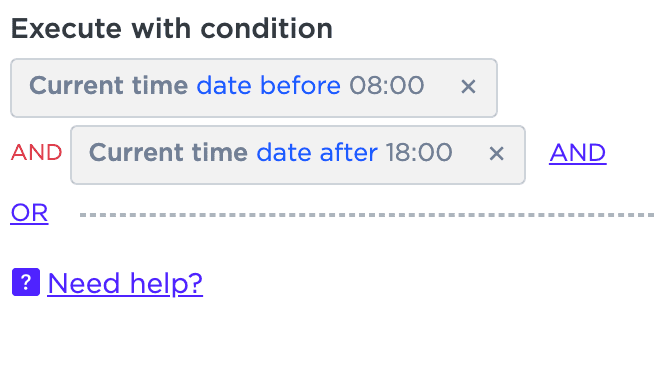
To execute a logical expression, it is sufficient that at least one block is true, and all conditions within that block must also be true. To add a new condition, use the “+“ button. To add a condition to an existing block use “AND“ and to create a new block use “OR“.
Each condition has the following elements
- Variable: chosen from the list of available variables.
- Variable internal index: used if the variable is an array.
- Operator: defines the method of comparison, e.g., equal to, not equal to, greater than, less than, etc.
- Operand: the value to which the variable will be compared.
The type of variable affects the available operators and operand type. In addition, you can invert any condition by setting the “NOT“ flag in the settings, which will reverse its value.
4. Managing events
Event blocks are triggered when certain actions occur, marked in blue or yellow. The script waits for the event and proceeds to the appropriate block or next step after the timeout expires (24 hours by default).
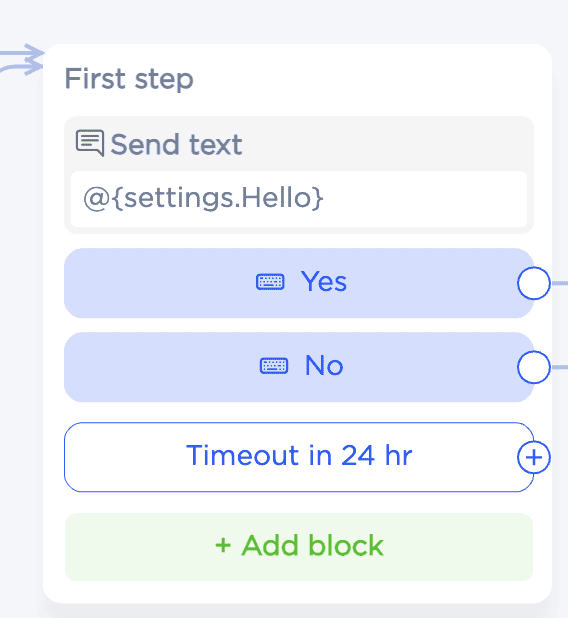
Unlike conditions, which are checked once when moving to a step, events are checked while waiting on that step. Most events are handled by all waiting scripts.
Blue events (incoming messages) are processed in order: scripts that sent the last message or were created earlier have priority. If no script has processed the message, it is passed to the global branch.
5. Types of events
- Message from a user: handled by a single script that takes precedence if it sent the last message. Conditions include full match, keywords, email, number, phone, image, or any reply.
- Email: message.email
- Number: message.text (if a number is entered, it will be saved as a number)
- Phone number: message.phone
- Picture: message.attachment
- Any reply: handles all unprocessed messages.
6. Waiting for events
Adding a wait block to steps allows the script to respond to specific user actions. For example, to wait for the word “yes“ to be entered, add a “Full match“ block with the required phrase. The step will wait for the “message from user“ event that matches the specified conditions.
 | 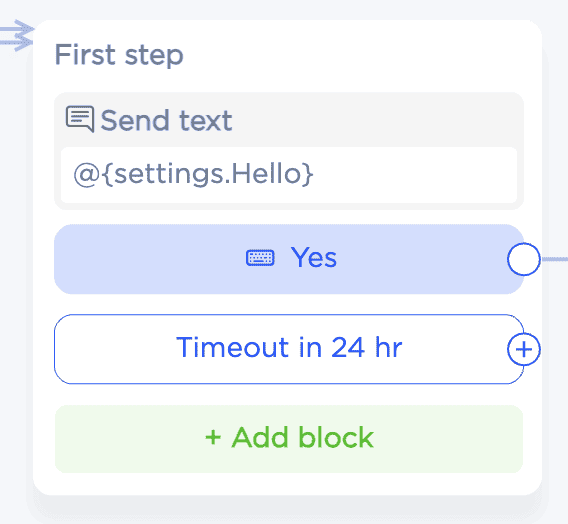 |
Multiple expected events can be configured in a step, and triggering one of them will continue the scenario execution. The event is activated when the scenario is in the corresponding step. The default timeout is 24 hours, but this can be changed in the step settings.
7. Global branches
If it is not known when an event occurs and it is not related to the script“s previous steps, “Global Branch“, a step with special event blocks, is used. When an event added to such a step occurs, a new script session starts and the script starts not from the Start step, but from the block event that occurred.
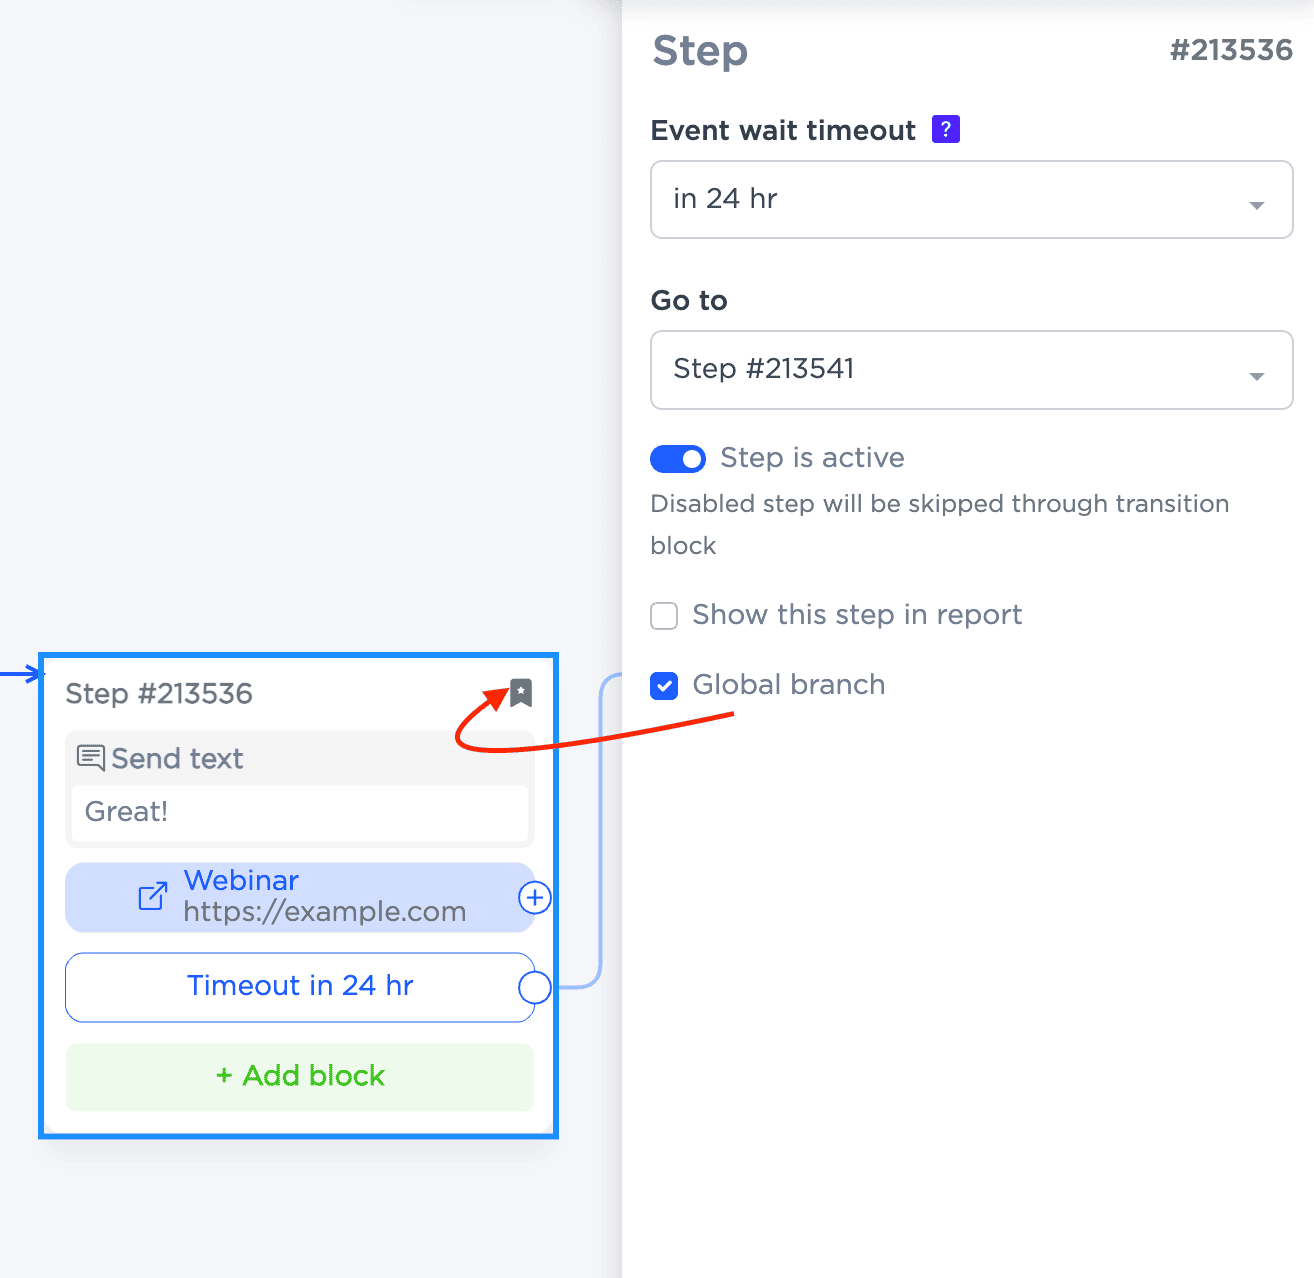
Global branches allow users to start scripts by keywords (for example, if the script previously stopped due to an inactivity timeout, but the user wants to continue using the menu) and perform background processing of events (for example, record all paid invoices in a table, track operator and customer communications, etc.).
A global branch allows you to create chatbot scripts with complex logic, where events can occur regardless of the current script state. We recommend that you use no more than one global branch in a project, and only in the main one, to simplify debugging.
8. Saving chatbot script
Once you are done customizing the script of a chatbot for Instagram, click “Save“. This action will save the changes made and update the script. It is important to remember that the changes will only take effect after saving.
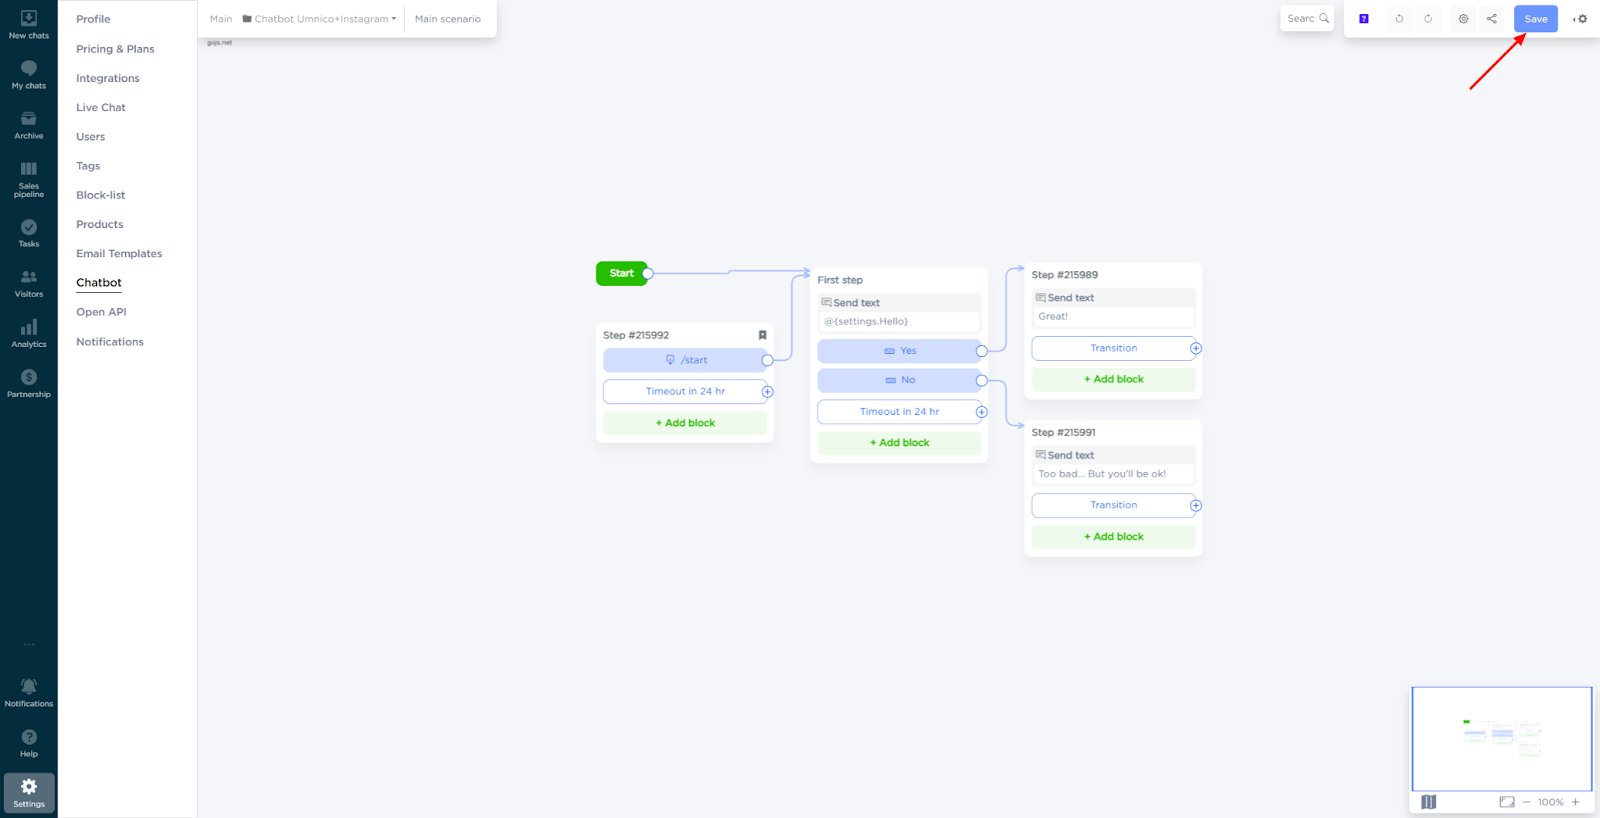
Saving the settings activates the chatbot, making it available to work with the selected messengers. Once saved, the chatbot will be able to interact with users according to the script, efficiently handling their inquiries and providing personalized support.
9. Testing chatbot for Instagram
To test the created chatbot for Instagram, start a dialog and send a message according to the conditions of the created scenario.
To access the chatbot on Instagram, click on the link located in the upper right corner of the Chatbot Builder interface.
In the window that opens, copy the unique code “restart-...” to verify that the conditions and actions of the chatbot script work.
Following these steps, you will be able to create and configure an effective chatbot for Instagram, which will help you set up effective automation of customer communications on Instagram.
How different businesses can use chatbot for Instagram
The popularity and vast capabilities of Instagram make the social media platform a useful customer communication channel for companies in a wide range of industries.
- Retail. Online shops can use chatbots to process and accept orders directly through Instagram, simplifying the shopping process. They can also help with selection by providing product information and answering frequent questions about shipping, returns, etc.
- Food industry. Restaurants and cafes can set up chatbots to take takeout or delivery orders and automate the process of table booking, freeing up hostesses to work more effectively with customers who have already arrived at the place.
- Beauty salons, gyms, and clinics can use an Instagram chatbot to process appointment bookings, send reminders about upcoming appointments, and tell customers about available promotions and special offers.
- Real estate. An Instagram chatbot can handle the initial stage of communication with new customers, telling them more about the property they“re interested in, and booking an appointment with an agent.
Still have questions? Contact us in the “Help - Chat with operator“ section of your personal account.

 3-days free trial period